Kid-approved kale smoothie

green-2607334_1920.jpg

We're in a deep freeze of January when everyone seems to have the sniffles. I live firmly by the belief that one of the best ways to stay healthy (aside from hand washing!) is through food. Eating healthy foods truly can boost the immune system when you need it most--and perhaps there's no better food for health than kale. It contains cold-fighting vitamins A, C, K and zinc PLUS protein, calcium and omega 3s.

Before you roll your eyes when I tell you that we start most mornings with a green smoothie, I'll first make my case on how easy it is to do (seriously!). Baby kale and strawberries store right in the freezer, so there's no need to keep fresh produce around. Plus, I'll make a big blender full and use it for two days in a row (just give it a whirl, and you're good to go!).

One of my most successful strategies with my kids has been to start easy on the kale and work your way up. Since kale has a stronger flavor profile than spinach, go light on the kale on your first batch, and gradually increase it as your kids get used to the taste. I hope your kids like this version as much as mine do!

Kid-approved kale smoothie

(makes 2 8-ounce smoothies) Ingredients: a handful of kale leaves, stems removed or baby kale 3 frozen strawberries 1 banana 1 cup almond milk (sub regular milk) (optional) 1 teaspoon honey* Directions: Mix all ingredients in a blender until smooth, add some water if it is too thick. Store in the refrigerator for up to two days (reblend before serving since ingredients will separate).

*Do not use honey for babies under age 1

Recipe: Squash and Apple Soup

pumpkin-soup-2972858_1920.jpg

I've always found that when it comes to Thanksgiving recipes, simplicity wins. Amidst all the heavy appetizers, a massive main meal, and the loads of desserts, this soup stands out as satisfyingly simple in its elements (it contains only 5 ingredients if you don't count the butter) and with all the flavors you crave on Thanksgiving day. It also gets its creaminess from the pureed squash--yep, there's no cream here--which is a welcome relief from the loads of rich and decadent foods.

In fact, I've made this soup almost every year for the past decade as a Thanksgiving appetizer, and it's a win with everyone. With subtle sweetness from the apples, it's a crowd pleaser for kids and adults. I serve it in the slow cooker, set on low, so it stays piping hot. Add pomegranate seeds to garnish, and the colors are vibrant and beautifully Fall in nature.

There are many ways to make a squash soup, and I always use Thanksgiving as an excuse to take shortcuts. You could buy a whole squash and cut it up yourself (more on how to do that here), or you could go for my choice and buy the more convenient (albeit: more expensive) prechopped squash.And like all soups, the longer it simmers, the better the flavors develop, so be sure to make this early Thanksgiving morning or even the day before. I've even made this a week or two before Turkey Day and kept it frozen until the day of, and no one was all the wiser.

If you have a baby, this soup too is a winner! It's the perfect pureed consistency for babies who aren't quite ready for textures, but it also contains delicious flavors and spices to help expand their little palates.

Squash and Apple Soup

Ingredients:

2 tbsp. butter

2 medium onions, diced

3 tsp curry powder

3-pound butternut squash, peeled, seeded and cubed (or around 3-4 cups butternut squash cubes OR 3 cups of butternut squash puree)

2 apples, peeled, cored, cubed

·3 cups chicken stock

salt and pepper to taste

Directions:

In a large pot over medium-low heat, melt the butter. Add onion and saute until tender. Stir in curry powder

Add squash, apples, chicken stock and salt. Bring to boil, reduce heat and simmer for 25 minutes or until squash and apples are tender

Use an immersion blender to puree the soup, or alternatively, transfer to the soup in batches to a blender (careful, it will be hot!). Serve warm with pomegranate seeds as a garnish.

Recipe: Cinnamon Apple Chips

dried-apples-1049483_1920.jpg

One thing is for sure at this time of year: You're going to be eating a lot of apples. Here in November, apples are the only fresh fruits left at the farm stand, and that fruit (along with pears and bananas), will be what my kids survive on until citrus season begins this winter. Happily, my kids LOVE apples--our family goes through at least a dozen a week!--but it's also nice to change things up a bit.

This recipe for baked apple chips is so simple, and it's the perfect project for a rainy homebound weekend day. All you have to do is slice the apples nice and thin, let the kids sprinkle on sugar and cinnamon, and then set them in the oven on low for an hour. Your home will smell wonderful all day, and you'll end up with sweet and crispy chips that are perfect for snacking by the handful or packing into lunch boxes.


Cinnamon Apple Chips

Ingredients:

2 apples

½ tsp cinnamon

½ tsp sugar

Directions:

Heat oven to 250 degrees. Line a baking sheet with parchment paper

Core the apples. With sharp knife, slice off 1/2-inch from top and bottom of apples and discard. Saw gently crosswise into very thin (1/8-inch) rings

Arrange apples on the baking sheet in a single layer. Place the sheet on the middle shelf in oven, and bake for 45min-1 hr until apple slices are lightly browned and almost dry to touch.

Let chips cool on racks completely before storing in airtight container.

Roasted Beet Hummus

beetroot-936429_1920.jpg

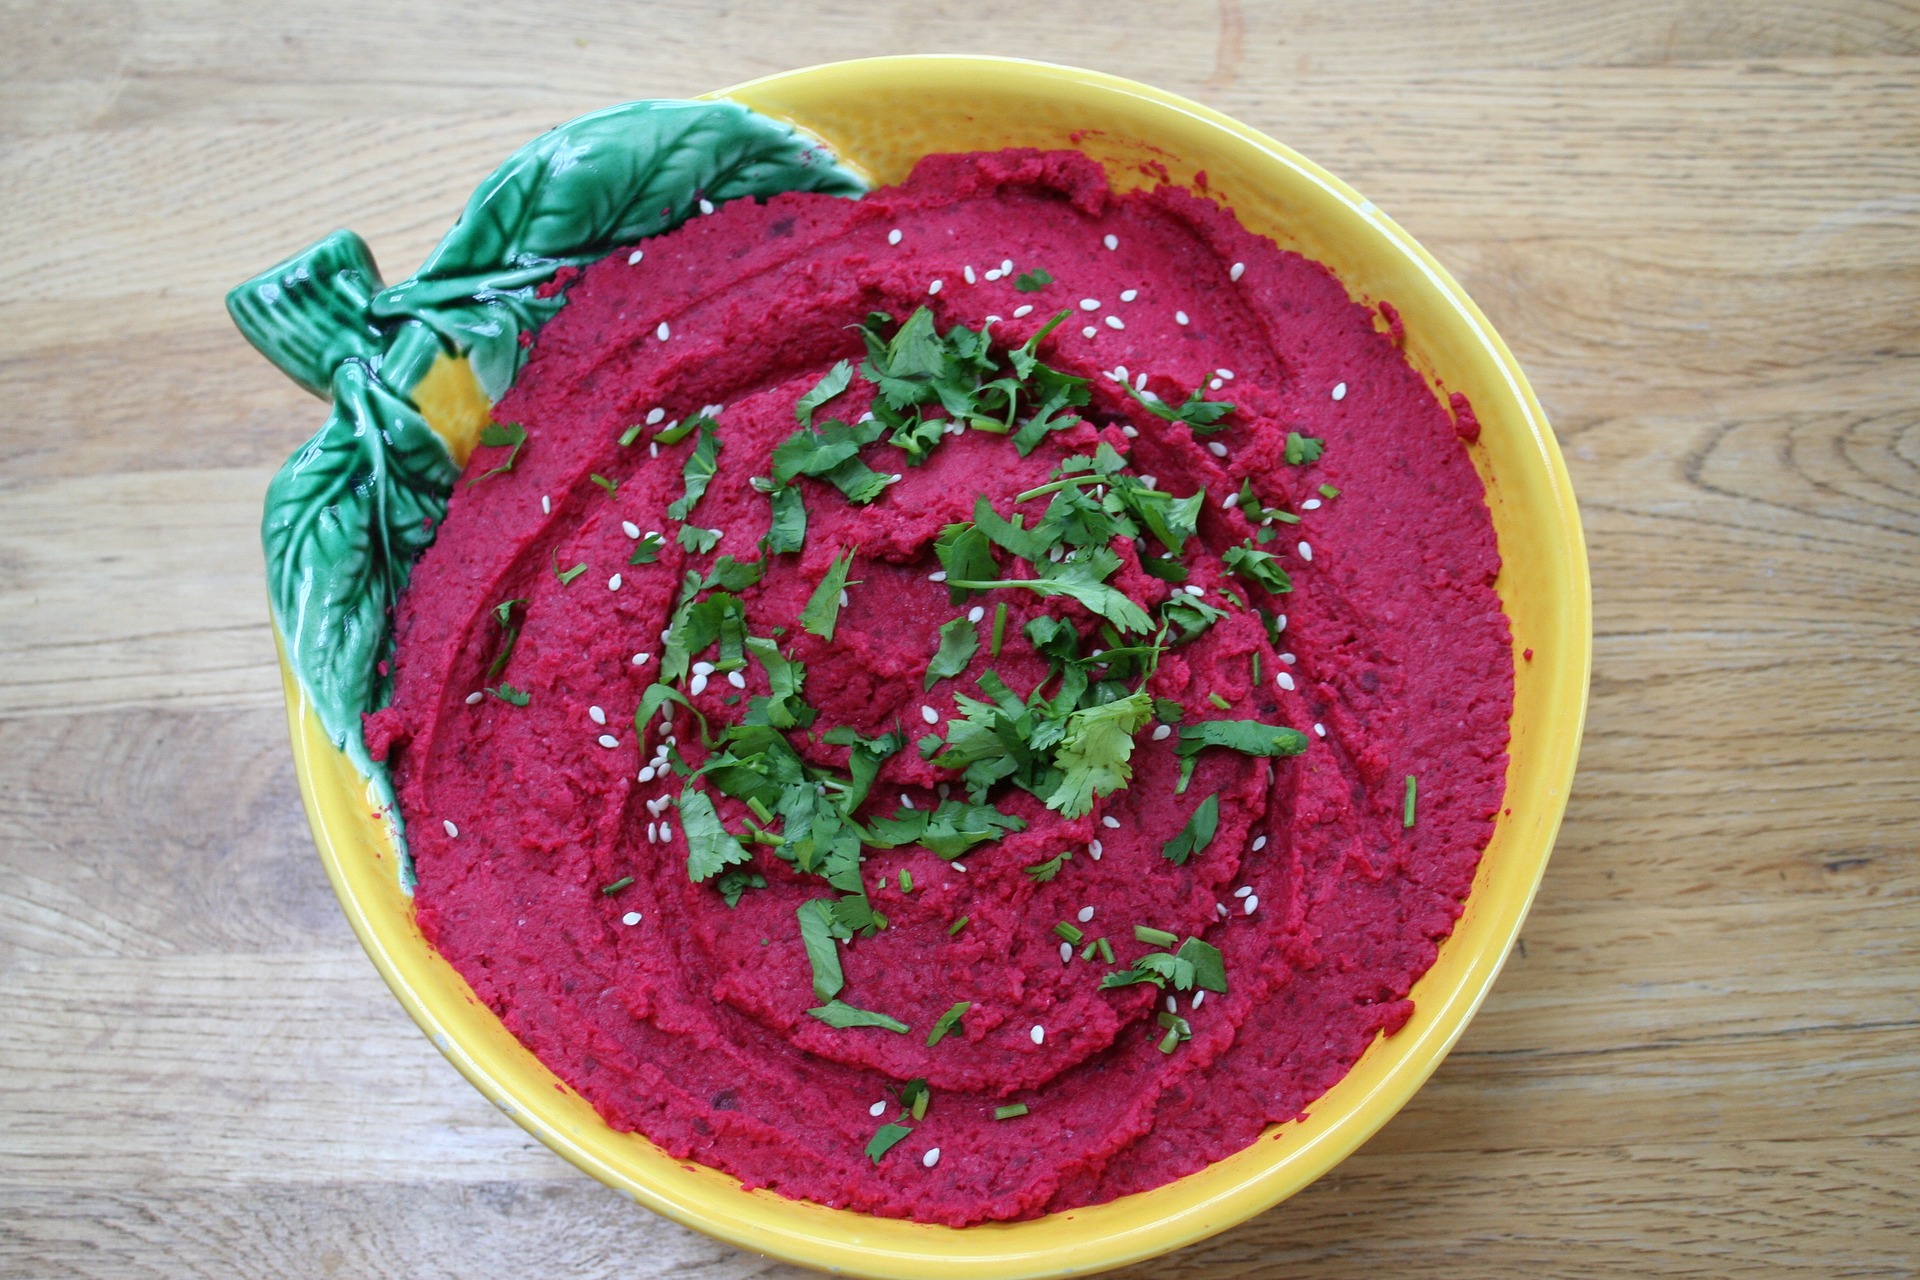
Seriously, does it get more beautiful than this? This recipe, which uses roasted beets in place of traditional chickpeas, makes a show-stopping spread (seriously, what little girl wouldn't love a PURPLE dip?) and is a great use for leftover roasted beets. I love adding this to a crudite platter alongside pita and veggies at a part--it adds a great pop of color

This recipe calls for 1 pound of roasted beets, but if you're starting out with our beet baby food ( Get the recipe here) you'll want to set aside about 1 cup of pureed beets to make this recipe in place of the cooked, roasted beets below. Add the pureed beets and follow the rest of the recipe as is.

Roasted Beet Hummus Ingredients: 1 lb cooked or roasted  beets, quartered  OR 1 1/2 cups beet puree 1/4 cup walnuts, toasted and roughly chopped (optional) 2 tablespoons lemon juice 1/2 tablespoon tahini 1/2 teaspoon ground cumin 1 garlic clove 1 tablespoon olive oil 1/2 teaspoon salt Directions: Place all the ingredients in a food processor and blend until smooth, stopping occasionally to scrape down the sides. Taste throughout and adjust the balance as you see fit. Serve immediately or refrigerate, covered, for up to 3 days. Garnish with sesame seeds and cilantro, if desired.

Blackberry-Balsamic Vinaigrette Recipe

blackberry-dressing.jpg

I always beg people not to buy store-bought salad dressing. For one, it's expensive when you compare it to the price it costs to make it yourself. Secondly, most brands are loaded with salt and sugar.  And lastly, homemade dressing takes seconds to make and tastes 10 thousand times better than any type of dressing you can get in a bottle. Trust us on this one. In the thirty seconds it will take you to whirl this together, you'll have a delicious dressing that you can use on salads, drizzle over chicken or grilled vegetables, or even use it as a delicious dipping sauce for grilled cheese or on a cheese board. Adding blackberries to your salad dressing makes it naturally sweet and adds a health boost. Read more about blackberries here!

Blackberry Balsamic  Vinaigrette

Ingredients: 1 cup fresh or frozen (and defrosted) blackberries 2 tbsp. Balsamic vinegar 3 tbsp. olive oil 1 tbsp. honey or maple syrup ½ tsp. Dijon mustard salt and pepper to taste

Directions:

Add all ingredients to a food processor or blender, and blend until smooth well. If dressing is too thick, you can thin it with a few drops of water. Store in refrigerator for up to one week.


Fresh Tomato Sauce

spaghetti-1392266_1920.jpg

I know what you're thinking...Why make may own when I can buy the jarred stuff?Hey, we get it--there's always a jar of sauce in our pantry for hectic weeknights. But homemade tomato sauce is surprisingly easy to make, and when you use summer's freshest tomatoes, there's no jar out there that can beat the taste. And if, like us, you're guilty of overdoing it at the farmer's market when you see all those bright red beauties--and then wondering what the heck to do with 10 pounds of tomatoes--this is the answer. Make a big batch and freeze it for the cooler months ahead..

Fresh Tomato Sauce Ingredients: 10 to 12 fresh plum tomatoes (approximately 2 to 2 1/2 pounds) 1/2 cup extra-virgin olive oil 3 cloves garlic, finely chopped Pinch crushed red pepper 1/2 medium onion, finely chopped Kosher salt Freshly chopped parsley and/or basil leaves Directions Place a large stock pot filled with water over medium-high heat and bring to a boil. Fill a large bowl with ice water. Using a paring knife, cut an X on the base of each tomato, being careful not to cut too deep. (This technique is called scoring). Then, place scored tomatoes into a pot of boiling water and boil for approximately 1 to 1 1/2 minutes. Remove tomatoes and plunge into cold water until they are cool enough to handle. At the location of the x, use your fingers to peel the skin off the tomatoes. Discard the skin. Dice peeled tomatoes and set aside. Heat olive oil in a saucepan over medium heat. Add garlic and crushed red pepper, and sauté until garlic starts to sizzle, around 2 minutes. Add chopped onion and sauté an additional 2 1/2 minutes, stirring frequently. Add chopped plum tomatoes and cook approximately 5 minutes. Add salt to taste. Then stir in herbs. For a smoother sauce. Transfer to a food processor to puree or use and immersion blender.

How to pick the healthiest granola bar

food-2202344_1920.jpg

Children loves granola bars, but many brands you'll find on the shelves contain as much sugar as candy bar! But healthy packaged ones do exist, and they're a great snack to have on the road or on those days that you simply don´t have time to make your own. When I buy granola bars at the grocery store, I look for these numbers on the nutrition panel:Calories: around 150 Sugar: less than 10 gram Fiber: more than 3 grams

Here's a list of my favorite granola bars that I feel good about giving to my kids.

Made good granola bars. A great choice for the school or camp since they are nut free and free from the most common allergens. They come in 4 delicious flavors AND are made with vegetables. 1 bar has 7 grams of sugar and 90 calories which is a good snack size especially for toddlers and prek aged kids.

Junkless Chewy Granola Bar: All four flavors are made with fewer than 8 ingredients, which is a refreshing shift from the lines of unpronounceable ingredients often found in store-bought bars. Our two favorite flavors are Cinnamon Roll and Chocolate Chip.

Cascadian Farms Organic, Oatmeal raisin granola bar. Lower in sugar than their other flavors with only 7g of sugar and 80 calories, this is also a great option for toddlers.

Kashi Chewy Granola Bar in Trail Mix Flavor. This contains nuts, so while it might not be a good option for school or the park, it's a great snack for safe environments and contains a filling 3g fiber.

Kind Cinnamon Oat Bars. Not all Kind Bars are low in sugar and nut-free, but these are, which make them a great choice for school. With only 5g of sugar and 2g of fiber, these are a healthy and filling choice.

Lära bars. Made exclusively with dried fruit and nuts (so not school friendly), these are high in good fats and natural sugars from the fruit. I have my kids split a bar.

Easy peasy peach salsa

mango-1467281_1920.jpg

Delicious when peaches are in season and when they're not (buy frozen slices), this salsa is delicious served with fresh pita chips or as a tropical topping for grilled fish, chicken, or tacos. Add a scoop to your toddler's high chair for a fun and colorful finger food. It's a crowd pleaser! Plus, peaches pack a nutritious punch. Click here to read all about the health benefits of peaches, plus the best ways to pick 'em and store 'em!

Easy Peasy Peach Salsa Ingredients 1 pound tomatoes, diced 1 bell pepper, seeded and finely diced 2 jalapenos, seeded and finely diced (optional) 1 medium red onion, finely diced 1½ pounds peaches, diced * ½ bunch cilantro, chopped 2 Tbsp. lime juice 1½ tsp salt, or to taste ¼ tsp freshly ground black pepper or to taste Directions: Combine all ingredients in a bowl and refrigerate for at least a half hour (or up to 2 days) to allow the flavors to develop.

*I liked the slightly larger dice for peaches to give them more of the center stage in this salsa. No need to peel them. You won't notice the peels and the color is prettier with the peel on.

How to choose the best cereal

cereal.jpeg

If your kids are like mine, they would eat cereal at every meal and snack of the day. But cereal can be one of those sneaky bad-for-you foods: The front of the box is packed with labels that make you think it's a good choice: "made with whole grains!" "now provides fiber!" "mother approved!" But front-of-box labeling is no indicator of health. To choose the healthiest cereal, you need to do your detective work on the back. Look for these 5 checkmarks before you toss that box in your cart. 

  1. Watch the sugar.  My kids love to pick their own cereal in the store, but they know to follow “mom´s 5 g rule”: each cereal must have less 5g or less of sugar per serving. Any more, and you're setting up your child for a sugar high--especially if you pair your cereal with a glass of juice. Some great options are CheerioSs, Barbara´s Original Puffins, General Mills Kix, and Kashi Honey Toasted Oats.
  2. Add "character" elsewhere. If you've ever taken a preschooler to the grocery store, you'll know that cereals targeted toward kids are conveniently placed at their eye level. We know your dirty secret, grocery-store placement person: The boxes are there so we toss it in our cart to avoid being that mom with a tantrumming toddler in aisle 5. Do yourself a favor and buy your kid a special character bowl and spoon instead of relying on the cereal to do the job.
  3. Go for fiber. Any cereal that has 3-5 grams of fiber per serving is likely a good choice. Most kids lack fiber in their diets—important for their digestive system and to keep them feeling fuller longer—and cereal is an easy way to help them reach their daily quota (around 11g a day for kids ages 3-5; more for older kids). Look for whole grain as a first ingredient, and give your bowl an extra fiber boost by topping your cereal with nuts,  fresh fruit, or ground flaxseed—something I like to do with a bowl of Cheerios!
  4. Limit the sodium. Now I don’t usually take a bite of cereal and think, “wow, this tastes salty!” But sodium is a common ingredient in packaged foods for flavor and preservation. To keep your daily sodium in check, look for a cereal that has less than 300mg per serving on that nutrition facts label again.
  5. Browse the ingredient list for junk. Artificial flavors and colors are a no-no on my list, and luckily, many cereal manufacturers are now labeling the front of their cereal boxes to let shoppers know their produce does NOT contain artificial flavors or ingredients. If you DON'T see this type of wording on the box and the ingredient list has lots of numbers and colors in it, then you might want to reconsider adding it to your cart.

What cereals are in your house that are both healthy and delicious?

Yes, you CAN bring back family dinner!

family-dinner.png

There's nothing more refreshing after a day full of work, school, activities, homework, meetings, and playdates than sitting down and having dinner with my family.  It's over food that we connect, talk, share and bond. That cherished family meal doesn't happen every night; for me and for most families, that would be impossible. The good news: Research shows that it only takes a minimum of 3 shared family meals per week (breakfast and lunch count, too!) to bring your family closer and make everyone healthier. How refreshing is that? For us, family meals happen mainly on the weekends when we have more time. I love to sit and chat after our plates are clean, and I always sip my wine slowly so my husband is forced to stay at the table with me! It's those meals that remind me of growing up; as a family, we always lingered around the dining table (and we still do when I visit home!). My plea to you is that you give your kids that same privilege—the payoffs of sharing a meal together are priceless, and they include .

  • Meals tend to be healthier and nutritious when they are prepared at home.
  • Children eat more fruit and vegetables when they see other family members eating it.
  • Adults and children alike are less likely to become overweight.
  • Children learn to communicate and interact better (especially in a world where everything happens online!).
  • Family meals are linked to lower levels of depressive symptoms in all family members and improved psychological wellbeing.
  • Family meals can help prevent destructive behavior, including lower rates of smoking, drinking, and illegal drug use in pre-teens and teenagers.
  • Children perform better in school.    

10 Ways to Make Family Dinners Doable, Easy, and Fun! 

1. Think about your week before your dive into the craziness of it all. Are any weeknights free of activities and doable for dinnertime together? Then set your goal to create a minimum of 3 family meals: Friday dinners, Sunday brunches, and Saturday lunch all count!

2. Plan a few meals in advance and add the ingredients to your weekly grocery list. Having everything on hand makes it much easier to whip something up without return trips to the grocery store or stressing out about what you're going to serve.

3. Turn the TV off and make it a rule that mealtime is free of all devices--your children (and you!) can survive 20 minutes without their phones or iPads!

4. Get the kids involved in cooking. Even babies as little as 1 or 2 years old can do certain tasks, such as peeling stickers off of fruit and veggies, washing them under running water, stirring, and pressing the buttons on the blender or food processor.

5. Keep meals simple. The goal is to spend quality time together--not to waste your whole night preparing something elaborate (and then feeling let down if your kids don't eat it.)

6. Create fun themes to get kids excited about mealtime: Think Macaroni Monday, Taco Tuesday, or Special Sunday Pancakes.

7. Let your child pick a recipe a week: Go to the grocery store together, gather the ingredients, and make it together. What they'll learn goes way beyond cooking: price, measurement, and more!

8. Make it enjoyable! Leave the serious discussions for later (read: no talk about Johnny's bad day at school), and let mealtime be a relaxing, calming, and comforting time.

9. Don't put pressure on the kids to eat what's on their plates. Instead, make the focus on the conversation and let the food be secondary. Nothing spoils dinner like constant pressure from parents telling their kids to take more bites.

10. Say grace and/or go around the table and have everyone say one thing they're happy about or thankful for.


What do you do to make family meals happen? Share your ideas--and inspire each other!